Pro Convert FAQs
Check these topics to find answers to your questions or learn more about the Pro Convert devices.

Check these topics to find answers to your questions or learn more about the Pro Convert devices.
| Pro Converts FAQs |
| 1. Which kind of video stream do Pro Convert devices support? Full NDI® or NDI®|HX? |
| Both Full NDI® and NDI®|HX are supported by Pro Convert decoders. Only Full NDI® is supported by Pro Convert encoders. |
| 2. Do Pro Convert devices support saving video files to local disk? |
| Yes. You can use OBS and other software to record video captured by Pro Convert device and save it to local disk. |
| 3. How can I add an NDI® source from a Pro Convert device to OBS? |
| Please go to OBS official website to download and install the NDI® plug-in, and then add NDI® source device in OBS. |
| 4. Can I view packet loss rate of Pro Convert device? |
| Yes. You can view the packet loss rate via the Web UI. In addition, packet loss is mostly caused by network conditions. It is recommended to set up a proprietary LAN to reduce packet loss rate caused by network delay and jitter. |
| 5. Is it complicated to set up the network configuration for the Pro Convert device? |
| You only need to ensure that the Pro Convert device and other devices in your NDI® workflow are in the same LAN, then the Pro Convert device automatically gets the IP address over the DHCP network. If your network is not DHCP, please refer to this article to log in to the Web UI and then go to "System > Network > ETHERNET" to set IP address manually. |
| 6. Can I set the output resolution and frame rate of Pro Concert devices? |
| Via Web UI, you can set the output frame rate (1, 1/2, 1/3, 1/4) and resolution. |
| 7. Can Pro Convert devices work across network segments? |
| Yes. This feature is provided by the latest firmware. |
| 8. What is the latency from encoding to rendering when using Pro Convert device to transmit 1080p30 signal? |
| During the processes of capturing video, NDI® encoding, transmission, NDI® decoding and rendering, the Pro Convert device is affected by network state, switches, decoders, and displays. Ideally, for a Magewell codec, delay when processing 1080p60 signals is about 70 ms. We recommend that you use hardware-only switches and monitors to avoid delays that brought by the operating system. If you use the Magewell Pro Convert NDI® decoding product, you can also use the device's Web UI to reduce the video buffer to further reduce the latency of the entire workflow. |
| 9. Do Pro Convert devices support multicast transmission? |
| Yes. But multicast transmission only recommended for LAN that is not connected to an external network. |
| 10. Does Magewell provide an SDK for Pro Convert? |
| Yes. We provide API documentations and example codes to help users easily use the interfaces and control Pro Convert devices. |
| 11. Is it possible to decode the NDI® stream emitted by another device using Magewell Pro Convert device? |
| Yes. The Pro Convert NDI® decoder can decode Full NDI®, NDI®|HX, and NDI®|HX2 streams sent from software or hardware encoding devices. |
| 1 x stream SD video = 20 Mbps |
| 1 x stream 720p50/59.94 video = 90Mbps |
| 1 x stream 1080i50/59.94 video = 100Mbps |
| 1 x stream 1080p50/59.94 video = 125Mbps |
| 1 x stream UHDp30 video = 200Mbps |
| 1 x stream UHDp60 video = 250Mbps |
| Actual bandwidth could vary according to the complexities of video. |
| In a DHCP-enabled LAN, the Pro Convert device is plug-and-play |
| Connect the converter to Ethernet network and power it up, then the unit will be assigned an IP address automatically, and the device is ready to work. To have great control on the device, like changing encoding/decoding parameters, you need to use the Web UI. Do the following steps to open the Web UI. |
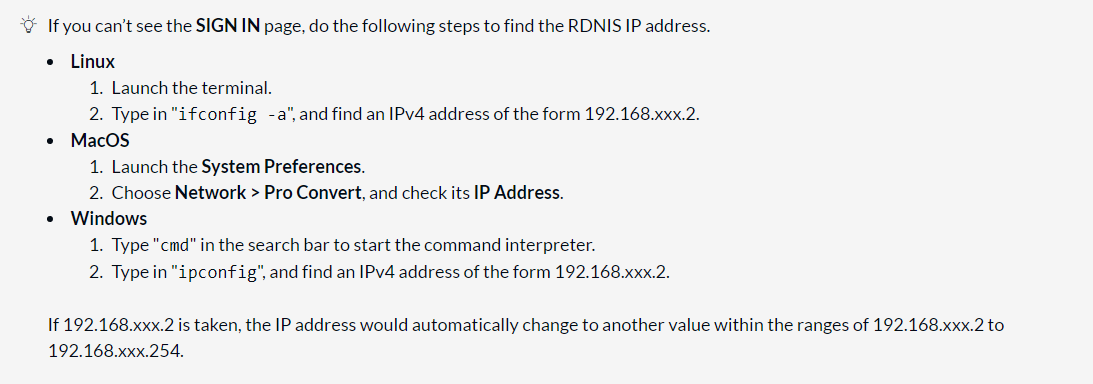
| For Linux and MacOS users, refer to the non-DHCP network operations below to get access to the Web UI and log in, then you can configure the device and monitor device status. |
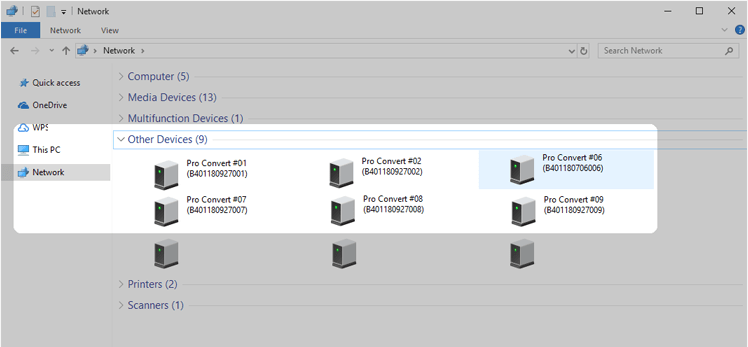
| For Windows user, do the following steps to open the Web UI: |
| 1. Open a File Explorer window. 2. Select the Network, and turn on the network discovery function if a prompt window appears. 3. Find your Pro Convert device in the Other Device section, where the detected device will be shown as "Pro Convert + #board index + (serial number)". 4. Double click the converter icon to open the Web UI in your web browser. |
 |
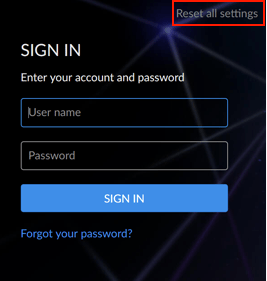
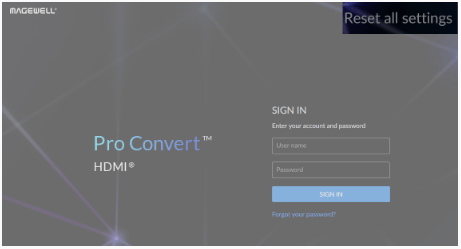
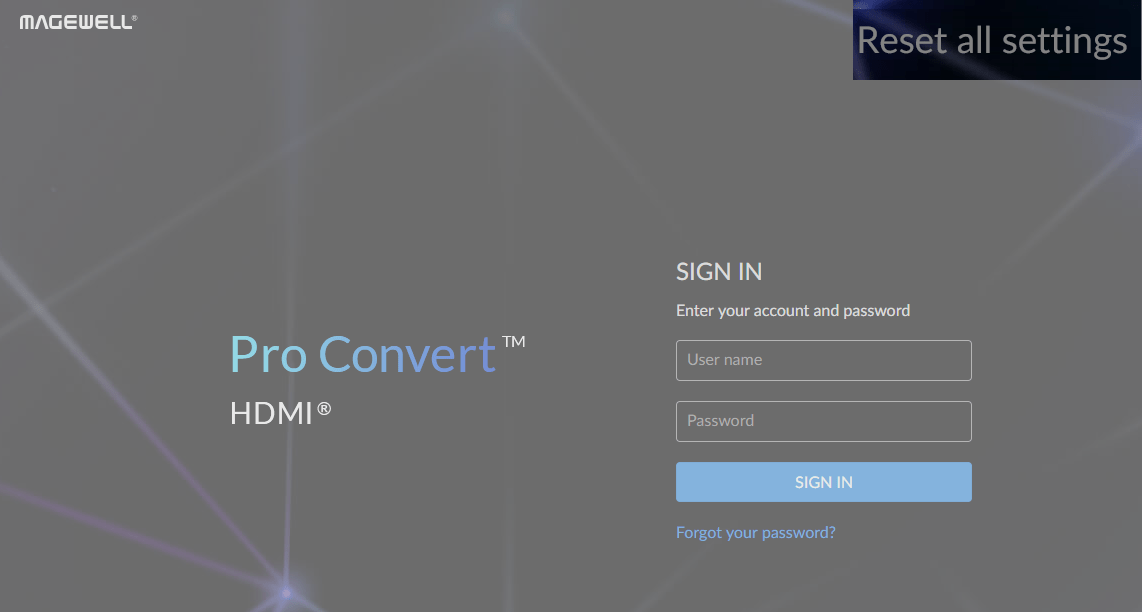
| After logging in successfully, you can do the configurations and monitor device status. If you forgot the password, click Reset all settings at the top-right corner of the SIGN IN page to set all parameters back to the default values, then you can log in with the default administrator account (case-sensitive): Username: Admin Password: Admin Note that the reset option is only available when connecting the convert directly to the PC via USB RNDIS. |
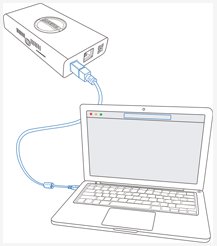 |
| In a non-DHCP LAN, you will have to set IP address manually in the Web UI 1. Get access to the Web UI via USB RNDIS a. Connect your computer and your device. b. Type http://192.168.66.1 in your web browser to log in. |
 |
| 2.Login Sign in using the default administrator account (case-sensitive). Username: Admin Password: Admin If you forgot the password, click Reset all settings at the top-right corner of the SIGN IN page to set all parameters back to the default values, then you can log in with the default administrator account. The reset option is only available when connecting the convert directly to the PC via USB RNDIS. |
 |
| 3. Set IP address manually a. After logging in with an admin account, go to System > Network. b. Turn on Set IP Address Manually, and then enter a new IP address, Subnet mask, Gateway, and DNS server. The IP address must be within the same network segment with your PC. c. Click Apply to save changes. |
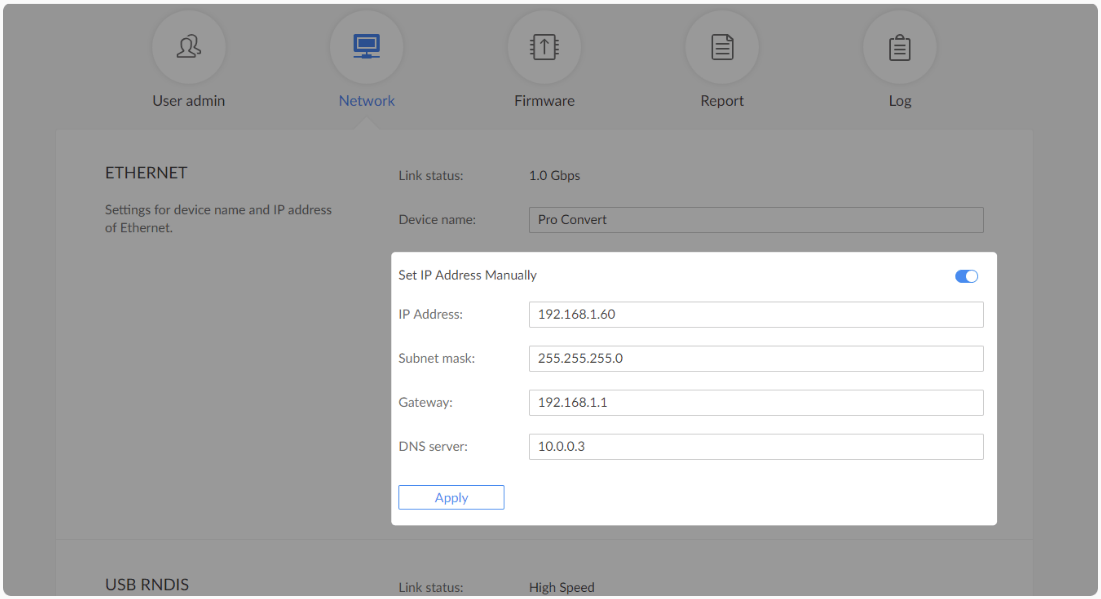 |
| Reference For the latest Pro Convert products, please visit our official website: https://www.magewell.com/pro-convert. For the list of NDI-enabled software, please refer to http://www.magewell.com/compatible-software. |
NewTek NDI 3.5 SDK and later are compatible with Pro Convert.
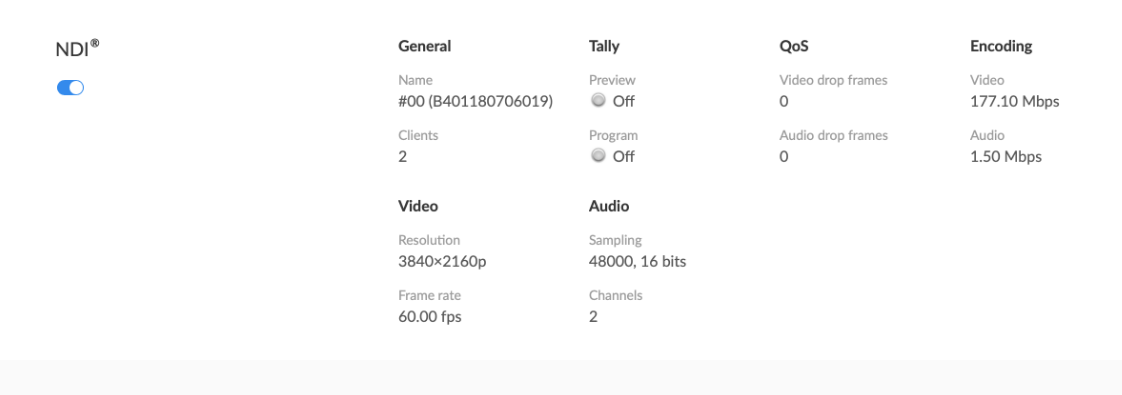
| 1. Log in Pro Convert Web UI. 2. Enter the Dashboard tab page, and then view the Resolution and Frame rate under the NDI > Video category. |
 |
We can't help you retrieve your password if you forget it. However, you can create a new password instead. If you are a general user, ask your administrator to assign a new password for you. If you are the administrator, you need to reset all settings to default values, then set a new admin password.
1 Forget the general user password 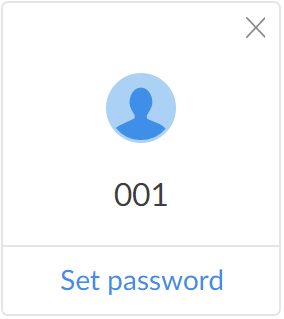
1. Access the Web UI, and sign in as administrator.
For instructions on how to access the Pro Convert Web UI, see how to configure Pro Convert via Web UI.
2. Click the System tab.
3. Click Set password, which appears when you approach the cursor to your user name.
4. Type in a new password, and confirm it in the prompt window.
The password is a string of 1 to 32 case-sensitive characters, which contains A-Z, a-z, 0-9 and special characters _-~!@#$%^&*-+=.
5. Click OK.
2 Forget the admin password
The default IP address of USB RNDIS is http://192.168.66.1. Please do not modify it unless there is a conflict in your network.
The reset process may take a few minutes.
The password is a string of 1 to 32 case-sensitive characters, which contains letters A-Z, a-z, numbers 0-9 and special characters _-~!@#$%^&*-+=.
You can update firmware via the Web UI with administrative right.
1. Access the Web UI, and sign in as administrator
For instructions on how to access the Pro Convert Web UI, see how to configure Pro Convert via Web UI.
2. Click the System tab, and then select Firmware.
3. Click Manual update.
4. Select your local updates package in the prompt window, and then click Open to upload the updates package.
5. In the Manual Update window, click Update.
DO NOT shut down or reboot the device during the updating procedure.
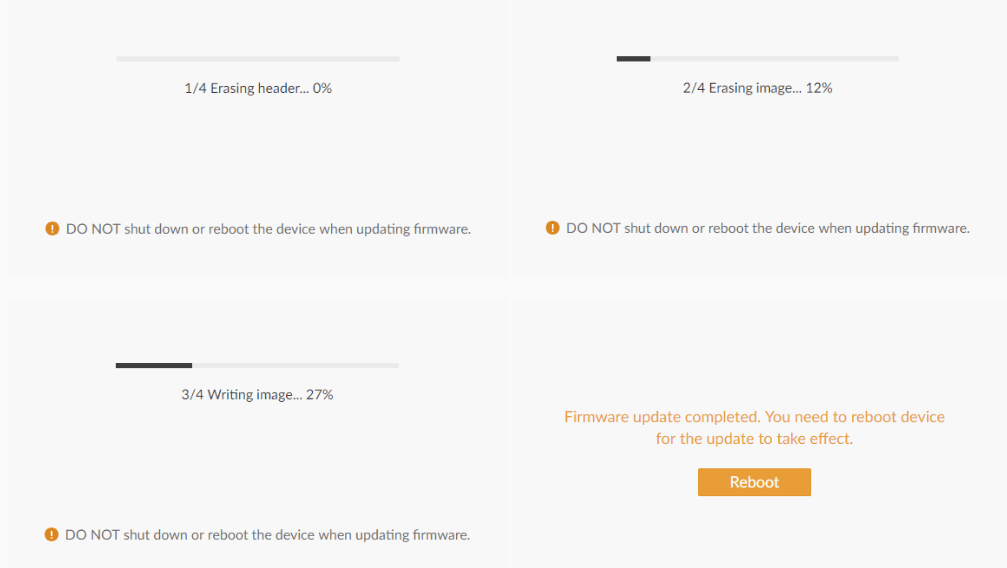
6. After loading successfully, click Reboot to complete the update.
The reboot process may take a few minutes.
7. Login the Web UI again and check the current Firmware version number in the Dashboard tab.
The Firmware version should be the same as the one you've uploaded.
| Resetting all settings will clear all your configurations. 1. Connect your converter to your computer. 2. Launch your web browser, and type in the USB RNDIS address to access the Web UI SIGN IN page. The default address is http://192.168.66.1. Please do not change it unless there is a conflict in your network. 3. Click Reset all settings in the top right corner of the SIGN IN page. The reset process may take a few minutes. |
 |
| Pro Convert allows you to set up and control via a web-based user interface as either an administrator or a general user. Changing the device name requires administrator rights, while changing the source name only requires general user rights. This article illustrates how to change the device name and source name via an administrator account. A general user account can only change the video source name, steps of which are the same as those an administrator dose. |
| 1 Access the Web UI, and sign in as administrator For instructions on how to access the Pro Convert Web UI, see how to configure Pro Convert via Web UI. |
| 2 Change Source name 1. Click the NDI® tab. 2. Change Source name. 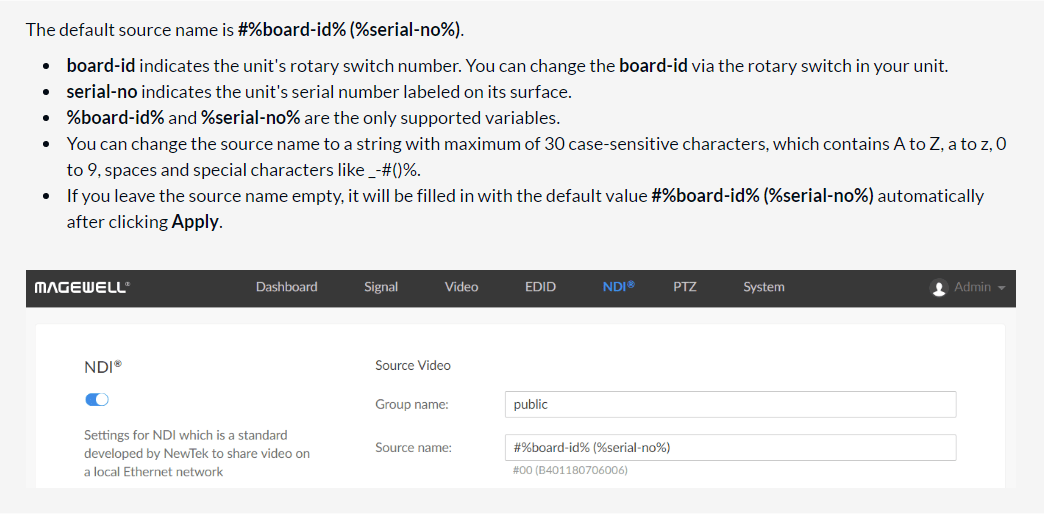 3. Click Apply to save changes. |
| 3 Change device name 1. Click the System > Network tab. 2. Change Device name. 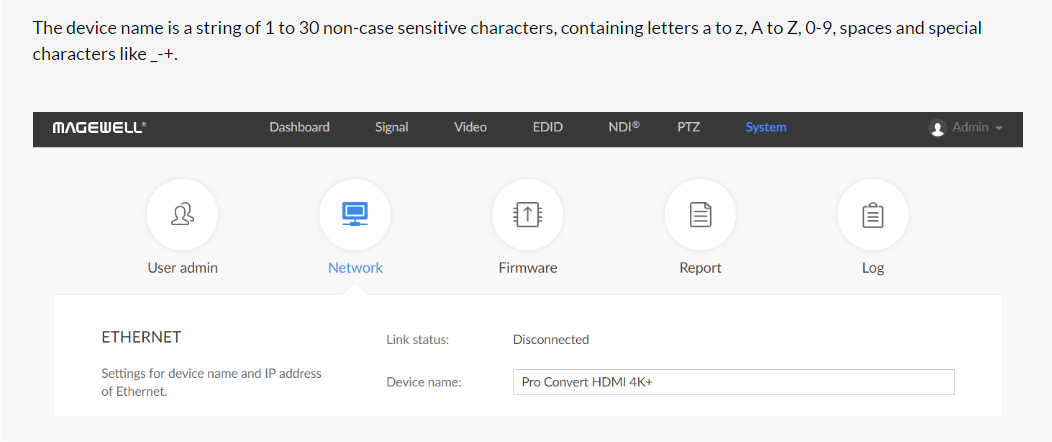 3. Click Apply to save changes. 4. Click Yes in the prompt dialog box. It may take a few minutes to make your settings take effect. |
| 4 Verify your settings 1. Click the Dashboard tab in the Web UI, check Device name, and Name in NDI® > General section. 2. Or open the NDI® Studio Monitor (click here to download the NDI tool). Then check the device name > NDI® stream channel. (See the picture below) 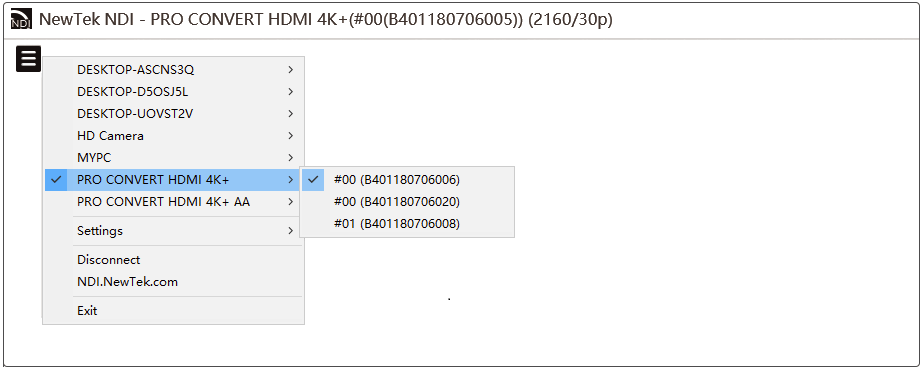 |
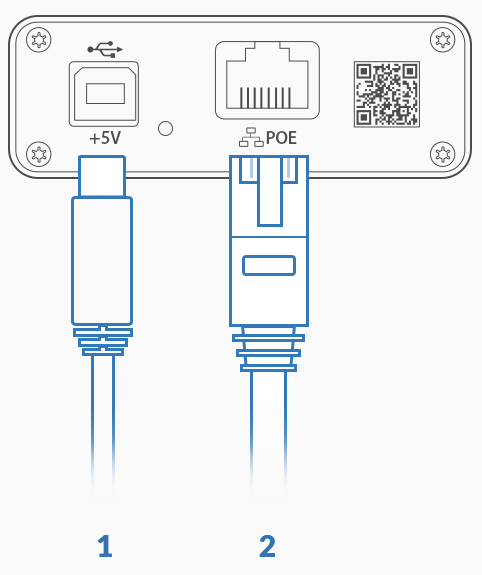
| There are two ways to power your converter: 1. Via USB: Plug in a USB cable for power supply. 2. Via PoE: Plug in a Ethernet cable, which is connected to a PoE switch, for power and Ethernet connection. |
 |
| Pro Convert device supports advanced control of the PTZ camera. Step are as follows: 1. Log in to the Pro Convert Web UI. 2. In the PTZ tab page, set Protocol to Visca or Visca UDP. 3. Expand Advanced Visca Parameters at the bottom of the page. 4. Check the user manual of the camera or contact the manufacturer for detailed control parameters of the camera. 5. Convert the values of camera parameters to decimal numbers and fill them in the corresponding parameter options. 6. Click apply to make the above configurations take effect. | 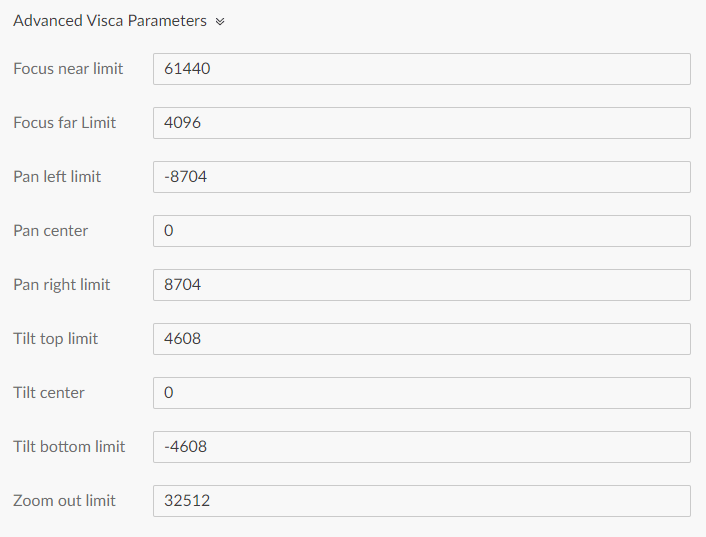 |
| Pro Convert device supports control of the network camera via the Visca UDP protocol, without the need to use a PTZ control line to connect the Pro Convert device to the PTZ camera. Steps are as follows: 1. Log in to the Pro Convert Web UI. 2. In the PTZ tab page, set the following parameters: • Protocol: Visca UDP • IP Address: The IP address of your camera • Port: Your camera's Visca protocol network port (check the user manual of the camera or contact the manufacturer to get it) • Visca UDP message header: Turn this option on if the transport protocol your camera (e.g. SONY camera) uses the Visca UDP header. 3. Click apply to make the above configurations take effect. | 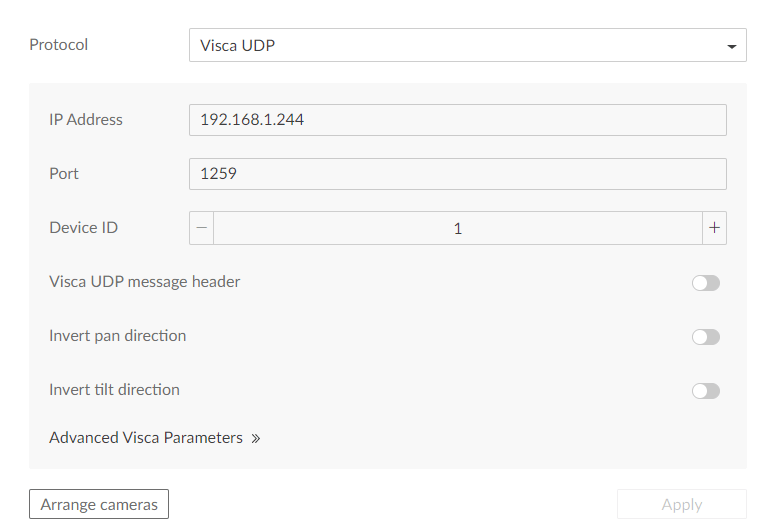 |
| Pro Convert allows you to set up and control it via a web-based user interface as an administrator account or a general user. You can get access to the Web UI using either NDI® Studio Monitor or USB RNDIS. Make sure that at least one of the following web browsers is equipped in your system. • Microsoft Internet Explorer 11 • Microsoft Edge • Mozilla Firefox version 61 and above • Google Chrome version 49 and above • Apple Safari 11.1 and above • Opera 55.0.2994.44 and above Method Ⅰ: Using USB RNDIS to configure Pro Convert For Mac users who are connecting via USB RNDIS for the first time, please download and install a RNDIS driver (like HoRNDIS) before connecting the USB cable. 1. Connect your converter to your computer via a USB cable. 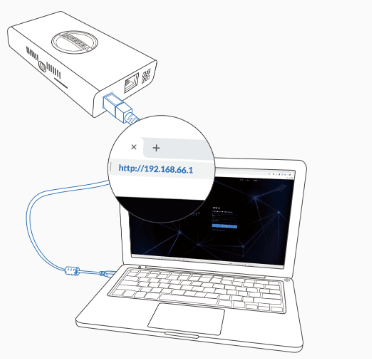 2. Run your web browser, and type in USB RNDIS address to access the Web UI. The default address is http://192.168.66.1. 3. Enter your account and password in the SIGN IN page, and configure the device after you login successfully. The default administrator account and password (case-sensitive) are as follows. • Username: Admin • Password: Admin 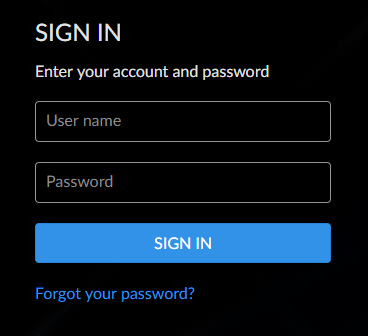 Method Ⅱ: Using File Explorer to configure Pro Convert (For Windows) 1. Open a File Explorer window. 2. Select the Network, and turn on the network discovery function if a prompt window appears. 3. Find your Pro Convert device in the Other Device section, where the detected device will be shown as "Pro Convert + #board index + (serial number)". 4. Double click the converter icon to open the Web UI in your web browser.  5. Enter your account and password in the SIGN IN page. The default administrator account and password (case-sensitive) are as follows. • Username: Admin • Password: Admin Method Ⅲ: Using NDI® Studio Monitor to configure Pro Convert 1. From a computer in the same LAN, download and install Studio Monitor from NewTek official site https://www.newtek.com/ndi/tools for free. 2. Launch Studio Monitor in your system. 3. Click the Menu icon at the top left, and then choose your NDI® channel: device name > source name. 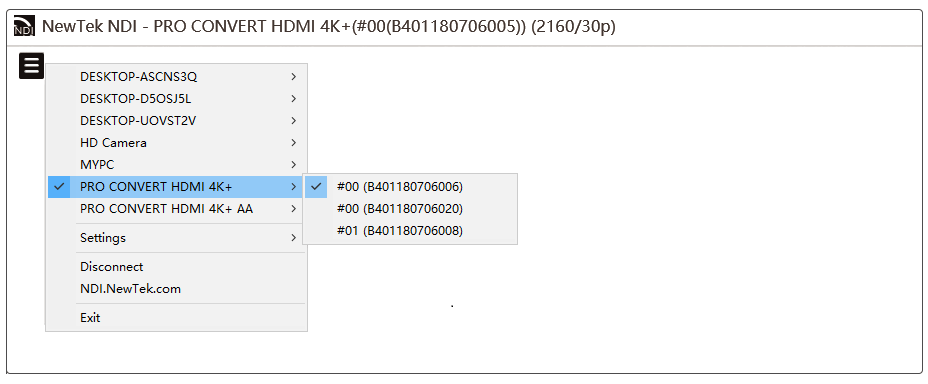 4. Click the gear icon at the bottom right. Then the web UI of your chosen device pops up in your web browser. 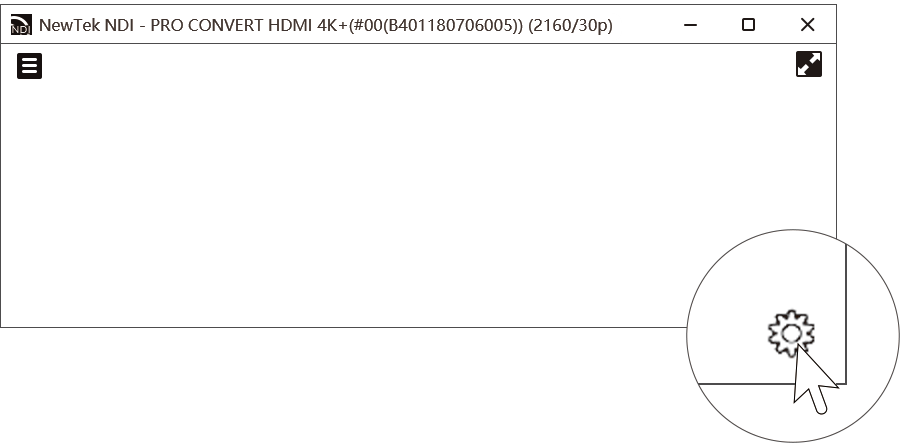 | |
| When an upgrade fails due to an upgrade fault and the device cannot boot, you can perform recovery upgrade so that the device can boot successfully. After the device starts up, you can then proceed to perform the normal upgrade. 1 Perform the recovery upgrade 1. Use the USB RNDIS function to connect devices. Use an USB cable to connect your Pro Convert device and your PC. Enter the IP address 192.168.66.1 in the explorer on your PC to access the recovery upgrade page as shown on the right. 2. Add the upgrade file on the recovery page. Follow the instructions to perform the recovery upgrade. 3. When the recovery succeeds, click Reboot. | 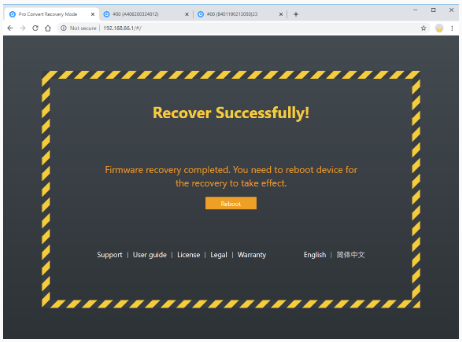 |
| 2 Perform the normal upgrade 1. When the Pro Convert device reboots, perform the normal upgrade on the Web UI. If your USB RNDIS address is not the default one, enter the Ethernet IP address or the actual USB RNDIS address of your Pro Convert device to open the Web UI, go to System > Firmware to perform the normal upgrade. 2. After the upgrade is complete, your device can run properly. | |
| 1 Make sure that the source is properly connected | |
| 2 Is the Pro Convert device connecting to any loop-through device? When the loop-through interface of the Pro Convert device is connected to a monitor and the SmartEDID function is enabled, the Pro Convert device may use the EDID of the loop-through monitor, which may result in the failure of the NDI Monitor to display the images properly. To turn off the Smart EDID function: 1. Log into the Pro Convert Web UI. For instructions on how to access the Pro Convert Web UI, see how to configure Pro Convert via Web UI. 2. In the EDID tab page, unselect the SmartEDID option. | 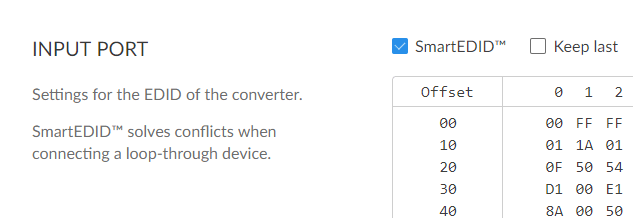 |
| 3 Are the computer and Pro Convert device on the same network segment? 1. In the File Explorer, click the Network tab in the sidebar. 2. In the Network window, expand Other Devices, and then look for your Pro Convert device. If your Pro Convert device is found, the computer is on the same network segment as the Pro Convert device. Otherwise, please reset the network of your computer or Pro Convert device. | 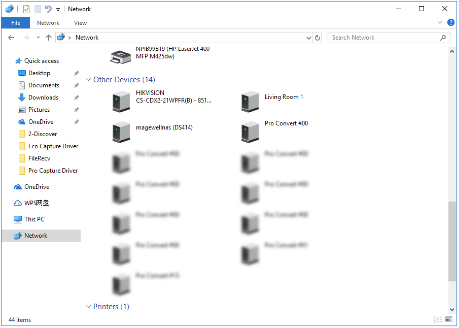 |
| 1 Are the computer and Pro Convert device on the same network segment? 1. In the File Explorer, click the Network tab in the sidebar. 2. In the Network window, expand Other Devices, and then look for your Pro Convert device. If your Pro Convert device is found, the computer is on the same network segment as the Pro Convert device. Otherwise, please reset the network of your computer or Pro Convert device. | |
| 2 Does the version of NDI SDK meet the minimum requirement? To use the Pro Convert device properly, please use NDI SDK 3.5 or newer. | |
| 3 Are the NDI software and Pro Convert device in the same group? If the NDI software and Pro Convert device are not in the same group, you can refer to the following solution: 1. Access the Web UI, and sign in as administrator. For instructions on how to access the Pro Convert Web UI, see how to configure Pro Convert via Web UI. 2.Enter the NDI tab page, and then set the Group name to "public". | |